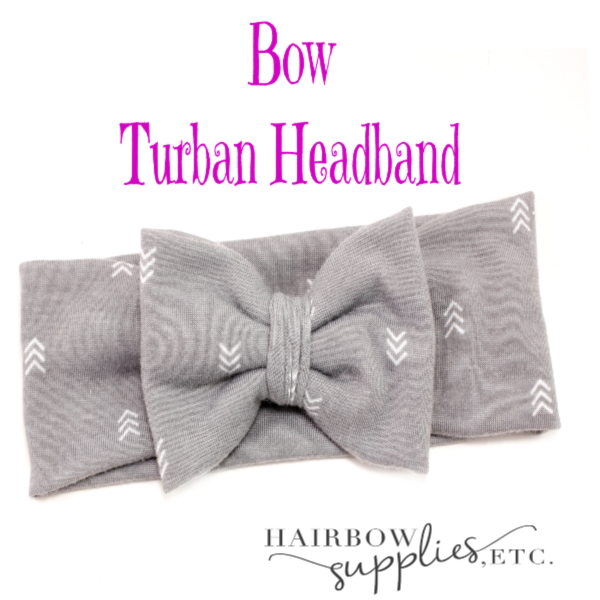
Today we are making a super adorable DIY baby turban headband with bow! This is such a cute bow headband to make using knit fabric! Knit fabrics are such soft, stretchy fabrics to use for headbands because the fabric gives and moves, as well as they are ultra soft and comfy to wear! The bow turban headband tutorial makes a beautiful headband for babies where the seams and ends of the fabric are hidden beautifully inside the bow, so you have a lovely headband to wear! In my tutorial, I’ll show you some tips and tricks I learned when using knit fabric.
First, you’ll need to get out your supplies:
6 inch by 3 inch piece of knit fabric (I like to buy my fabric on Amazon, Hobby Lobby, and Girl Charlee (for the bow center)
6 inch by 9 inch piece of knit fabric (for the bow)
6 inch by 16 inch piece of knit fabric (for the headband) (for a 6-12 month old)
Rotary Scissors and Fabric Cutting Board
Measuring Tape or Ruler
What you’ll need to do first is cut out your fabric.
For a 6-12 month old: 6″ by 16″
12-24 months: 6″ by 18″
2 years and older: 6″ by 19.5″
Teen/Adult: 6″ by 21″
Knit fabric can be a little bit tricky. Are you up for a challenge? Great! Let’s do it! So, get out your fabric cutting board and your rotary scissors. I lined up my fabric from the edge to the edge and cut out a long 6 inch strip of fabric lengthwise. Then, from the 6 inch strip, I measured and cut another 3 inches, 9 inches, and 12 inch wide piece using my rotary scissors. I definitely ironed my fabric after that to help with the knit from curling up so much. I also read that you can use fabric starch before you iron so that you can keep the knit from curling.
Next, take your 3 fabric pieces that are 6 inches wide and fold them vertically (top to bottom).

Then, pin them together.

Once you have the fabric pinned, the knit curling shouldn’t be an issue any more. Take that sigh of relief! You made it this far!
Go to your sewing machine, and make sure that your sewing machine is on a zigzag stitch.
This will help your stitching to stay in place, for the stitch to give when the fabric is stretched in the headband, and for the stitch not to break when it’s stretched. Take your 3 pieces and sew down the 1/4 inch seam and make a tube.

Now, cut your threads and turn each piece inside out. Then, take your smallest piece and set it to the side.

For your 2 larger fabric pieces, take them and fold them seams toward the inside.

See the seams? They need to be on the inside.

Then take the two ends and pin them together.

Let’s head back to the sewing machine!

Sew your ends down a 1/4 inch seam and then remove your straight pins.

Now, take your headband and bow and bring the ends of the fabric to the center of your bow and headband.

Next, take your headband and your bow and line up the ends of the fabric together and sandwich the 2 pieces together.

Make sure that your bow is centered with 2 inches to the right and 2 inches to the left of the inside seam.

Then, pin your bow to the headband. We’re going to go to the sewing machine one more time. 😊

Take the top of the headband and bow, and sew right down the center of your bow. (When you’re sewing make sure you’re just sewing through one side of the headband.)

Now, get your needle and thread handy.

Gather your bow in an accordion style fold.

Put your needle through the bow and wrap your thread around your bow a few times. Then, secure it off in the back.

Remember the 1st smaller piece of headband that you sewed in the beginning? Now is your time to get that little piece back out!

Okay, so what you need to do is fold the bow center right sides together (and seams facing out) around the end of your headband. Pin this.
Then go back and sew the bow center pretty close around the headband without sewing directly onto the headband. You want to leave a little give room because you’ll be turning this inside out.

Trim the edges of your fabric and turn your fabric inside out.

Next, pull the bow center up and over the bow so that you can get the bow center to the center of your bow.

Once that’s there, you can adjust your bow how you’d like it to look.
So how’d your DIY turban headband turn out? I’m sure you did great!!! Keep practicing and using knit will be so much easier!
I LOVE this tutorial because the ends of the fabric are hidden underneath the bow. This makes for a soft, beautiful headband for your baby or toddler! I love the fabrics I found at Hobby Lobby!
They really have the trendiest, cutest fabrics! Thanks for joining us for another tutorial! I can’t wait until next week’s headband tutorial about making a top knot turban head wrap! You’re going to love it!